(2011-07の一覧)
01 02 03 04 05 06 07 08 09 10 11 12 13 14 15 16 17 18 19 20 21 22 23 24 25 26 27 28 29 30 31
2011-07-25 Mon (他の年の同じ日: 2005 2006 2007)
PreferenceScreenに依存設定(dependency)を行ってチェックオフ時は操作不可
2011-07-25-1 / カテゴリ: [Android] / [permlink]
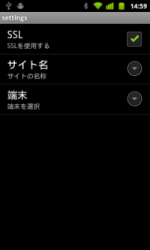
[2011-07-03-1]の各設定を「通信を許可」というチェックがonの場合のみ操作できるようにしてみる。
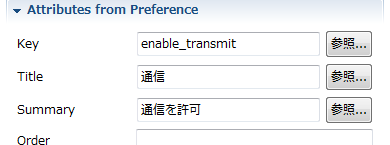
チェックボックスを追加して

属性を設定(手抜き見やすくするために 以下同文)

全体でこんな感じ
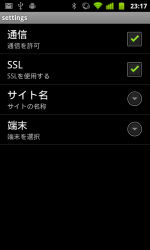
で、こうなる。
左がチェックoff(disable)で、右がチェックon

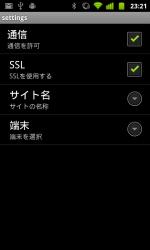
さらに、子要素用のレイアウト指定をすることで(図はわかりにくいけど)若干インデントが掛かる
xml(抜粋) はこんな感じ

「通信を許可」のチェックボックス追加
ここは簡単に。チェックボックスを追加して
属性を設定(
依存の設定
既存の「SSL(チェックボックス)」「サイト名(EditText)」「端末(List)」それぞれの「Dependency」に、追加した「通信を許可」のKeyを設定する。全体でこんな感じ
<?xml version="1.0" encoding="utf-8"?>
<PreferenceScreen
	xmlns:android="http://schemas.android.com/apk/res/android"
>
	<CheckBoxPreference
		android:title="通信"
		android:key="enable_transmit"
		android:summary="通信を許可"
	></CheckBoxPreference>

	<CheckBoxPreference
		android:summary="SSLを使用する"
		android:key="usessl"
		android:title="SSL"
		android:dependency="enable_transmit"
	></CheckBoxPreference>

	<EditTextPreference
		android:key="name"
		android:title="サイト名"
		android:summary="サイトの名称"
		android:dependency="enable_transmit"
	></EditTextPreference>

	<ListPreference
		android:key="list"
		android:entryValues="@array/listpref_value"
		android:entries="@array/listpref_entries"
		android:title="端末"
		android:summary="端末を選択"
		android:dependency="enable_transmit"
	></ListPreference>


</PreferenceScreen>
で、こうなる。
左がチェックoff(disable)で、右がチェックon


さらに、子要素用のレイアウト指定をすることで(図はわかりにくいけど)若干インデントが掛かる

xml(抜粋) はこんな感じ
	<CheckBoxPreference
		android:summary="SSLを使用する"
		android:key="usessl"
		android:title="SSL"
		android:dependency="enable_transmit"
		android:layout="?android:attr/preferenceLayoutChild"
	></CheckBoxPreference>
[
コメント ]
2011-07-13 Wed (他の年の同じ日: 2005 2006)
PopupWindow#showAtLocation()が表示されない?
2011-07-13-1 / カテゴリ: [Android] / [permlink]
newした後、showAsDropDown()だけなら表示されるのに、showAtLocation()だけ叩いても表示されなかった。
いろいろ試してみると setWindowLayoutMode() が必要なのがわかった。
こんな感じ
ちなみにdismiss()せずにActivityを閉じると例外(?)が発生するので注意
いろいろ試してみると setWindowLayoutMode() が必要なのがわかった。
こんな感じ
mPopup = new PopupWindow(this);
mPopup.setWindowLayoutMode(LayoutParams.WRAP_CONTENT, LayoutParams.WRAP_CONTENT);
mPopup.setFocusable(true);	// これがないとタッチとかできない

// 必要に応じて
mPopup.setWidth(WindowManager.LayoutParams.WRAP_CONTENT);
mPopup.setHeight(WindowManager.LayoutParams.WRAP_CONTENT);

// ポップアップで表示するビューの設定
mPopup.setContentView(view);

if (mPopup.isShowing()) {
	// 開いてたら閉じる
	mPopup.dismiss();
	mPopup = null;
}
else {
	// 開いてなければ表示
	mPopup.showAtLocation(base, Gravity.NO_GRAVITY, x, y);
}
ちなみにdismiss()せずにActivityを閉じると例外(?)が発生するので注意
ERROR/WindowManager(13219): Activity (パッケージ名).(クラス名) has leaked window android.widget.PopupWindow$PopupViewContainer@40533870 that was originally added here
ERROR/WindowManager(13219): android.view.WindowLeaked: Activity (パッケージ名).(クラス名) has leaked window android.widget.PopupWindow$PopupViewContainer@40533870 that was originally added here
:
[
コメント ]
2011-07-12 Tue (他の年の同じ日: 2005)
ショートカット一覧の取得
2011-07-12-1 / カテゴリ: [Android] / [permlink]
アプリ一覧はいくらでも出てくるのに、ショートカットは検索しても出てこなかった(多分探し方が悪い)ので標準のホームアプリ(ランチャー)のソースを見て調べてみた。
ショートカットの一覧の取得は、アプリ一覧と異なり「Gmailのラベル」や「ブックマーク」などの「選択した後にアプリ固有の設定(選択)」があるので、単純なリスト取得ではできず、startActivityForResult()による起動と、onActivityResult()による結果の取得が必要。
たぶん
(ダイアログのタイトル(EXTRA_TITLE))はリソースに記述して getText(res_id) が良いけどとりあえず)
こんな感じ
この時点(startActivityForResult()コール)で、ショートカット一覧のダイアログは起動する。
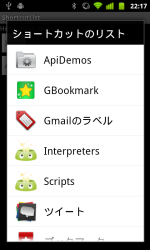
その中から一つ選択すると、onActivityResult()がコールバックされる。
とりあえず全体。
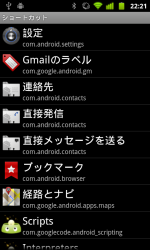
これで、「Gmailのラベル選択」や「twiccaのリスト選択」などのActivityが起動する。固有設定が特にないショートカットについては、startActivityForResult()のあとすぐに onActivityResult()がコールバックされる。
固有設定がある項目の場合は、設定(選択)が完了すれば onActivityResult() がコールバックされる。
で case REQUEST_CREATE_SHORTCUT の部分。
あとはこのリストをListViewに突っ込み、タップ時に
一応、ResolveInfo の情報を保持するためのクラスと、ListViewにsetするためのAdapterとListView内のレイアウトファイル
全体でこんな感じ
以下、調べたときのログ。↑でうまくいかないときはチェックしてみて(ぇ
ショートカットの一覧の取得は、アプリ一覧と異なり「Gmailのラベル」や「ブックマーク」などの「選択した後にアプリ固有の設定(選択)」があるので、単純なリスト取得ではできず、startActivityForResult()による起動と、onActivityResult()による結果の取得が必要。
たぶん
- インテント ACTION_PICK_ACTIVITY を起動し、標準(?)の選択ダイアログを起動して固有設定を選択させる(ホーム画面のロングタップの「ショートカット」と同じ要領)
- ショートカットの大元の一覧を取得し、自前のListViewなどで表示・ユーザに更に固有設定を選択させる
ACTION_PICK_ACTIVITYを使ったショートカット一覧の取得
適当なとこで以下のIntentを起動。(ダイアログのタイトル(EXTRA_TITLE))はリソースに記述して getText(res_id) が良いけどとりあえず)
	Intent intent = new Intent(Intent.ACTION_PICK_ACTIVITY);
	intent.putExtra(Intent.EXTRA_INTENT, new Intent(Intent.ACTION_CREATE_SHORTCUT));
	intent.putExtra(Intent.EXTRA_TITLE, "ショートカットのリスト");

	startActivityForResult(intent, REQUEST_PICK_SHORTCUT);
startActivityForResult()は、一覧の取得と、固有設定の結果取得の2度呼ばれるので、第2引数のフラグ値は2種類定義しておく。
こんな感じ
private static final int REQUEST_PICK_SHORTCUT = 0x100;
private static final int REQUEST_CREATE_SHORTCUT = 0x200;
この時点(startActivityForResult()コール)で、ショートカット一覧のダイアログは起動する。

その中から一つ選択すると、onActivityResult()がコールバックされる。
とりあえず全体。
@Override
protected void onActivityResult(int requestCode, int resultCode, Intent data) {
	super.onActivityResult(requestCode, resultCode, data);
	Log.d(TAG, "onActivityResult()" + resultCode);

	if (resultCode == RESULT_OK) {
		switch (requestCode) {
		case REQUEST_PICK_SHORTCUT:
			Log.d(TAG, "REQUEST_PICK_SHORTCUT");
			processShortcut(data);
			break;

		case REQUEST_CREATE_SHORTCUT:
			Log.d(TAG, "REQUEST_CREATE_SHORTCUT");
			completeAddShortcut(data);
			break;

		default:
			Log.d(TAG, "default");
			break;
		}
	}
	else {
		Log.d(TAG, "canceled");
	}
}
最初(リストからの選択)は、case REQUEST_PICK_SHORTCUT の部分。
void processShortcut(Intent intent) {
	startActivityForResult(intent, REQUEST_CREATE_SHORTCUT);
}
とくに処理なし(笑)、onActivityResult()でコールバックされてきた Intent 変数を、再度 startActivityForResult() する。これで、「Gmailのラベル選択」や「twiccaのリスト選択」などのActivityが起動する。固有設定が特にないショートカットについては、startActivityForResult()のあとすぐに onActivityResult()がコールバックされる。
固有設定がある項目の場合は、設定(選択)が完了すれば onActivityResult() がコールバックされる。
で case REQUEST_CREATE_SHORTCUT の部分。
private void completeAddShortcut(Intent data) {
	String name = data.getStringExtra(Intent.EXTRA_SHORTCUT_NAME);
	Log.d(TAG, "shortcut name: " + name);

	Intent intent = data.getParcelableExtra(Intent.EXTRA_SHORTCUT_INTENT);

	// とりあえず
	startActivity(intent);
}
getParcelableExtra()で、対象のショートカットのIntentが取得できる。自前で取得・表示・選択処理
アプリの一覧取得と同じく、android.content.pm.PackageManager を使う。
	PackageManager pm = getPackageManager();
	List<ResolveInfo> infos = pm.queryIntentActivities(new Intent(Intent.ACTION_CREATE_SHORTCUT), 0);

	for (ResolveInfo info : infos) {
		Log.d(TAG, "packagename: " + info.activityInfo.packageName);	// パッケージ名
		Log.d(TAG, "activityname: " + info.activityInfo.name);		// アクティビティ名
		Log.d(TAG, "appname: " + info.loadLabel(pm).toString());	// 表示名
		Log.d(TAG, "icon: " + info.loadIcon(pm));			// アイコン
	}
これで表示に必要なショートカット名とアイコン、起動に必要なパッケージ名とアクティビティ名が取れる。あとはこのリストをListViewに突っ込み、タップ時に
@Override
public void onItemClick(AdapterView<?> parent, View view, int position, long id) {
	ListView list = (ListView) parent;

	/* 中略 */
	String packagename = "パッケージ名";		// ↑のinfo.activityInfo.packageName の値
	String activityname = "アクティビティ名";	// ↑のinfo.activityInfo.name の値

	Intent intent = new Intent(Intent.ACTION_CREATE_SHORTCUT);
	intent.setClassName(packagename, activityname);
	startActivityForResult(intent, 1);
}
などすれば、ACTION_PICK_ACTIVITY 使用の場合と同じく、固有設定のActivityが起動される(なければすぐ onActivityResult()がコールバック)ので、後はcompleteAddShortcut()と同じ。一応、ResolveInfo の情報を保持するためのクラスと、ListViewにsetするためのAdapterとListView内のレイアウトファイル
全体でこんな感じ
	ArrayList<AppInfoItem> items = new ArrayList<AppInfoItem>();
	AppInfoItem item;
	ListView listView = (ListView) findViewById(R.id.listView1);

	PackageManager pm = getPackageManager();
	List<ResolveInfo> infos = pm.queryIntentActivities(new Intent(Intent.ACTION_CREATE_SHORTCUT), 0);

	for (ResolveInfo info : infos) {
		item = new AppInfoItem();
		Log.d(TAG, "packagename: " + info.activityInfo.packageName);
		Log.d(TAG, "classname: " + info.activityInfo.name);
		Log.d(TAG, "appname: " + info.loadLabel(pm).toString());
		Log.d(TAG, "activityname: " + info.activityInfo.name);

		item.setAppName(info.loadLabel(pm).toString());
		item.setAppPackageName(info.activityInfo.packageName);
		item.setAppIcon(info.loadIcon(pm));
		item.setActivityName(info.activityInfo.name);
		items.add(item);
	}

	AppInfoAdapter adapter = new AppInfoAdapter(this, items);
	listView.setAdapter(adapter);
	listView.setOnItemClickListener(this);

以下、調べたときのログ。↑でうまくいかないときはチェックしてみて(ぇ
《続きを読む》
[
コメント ]
2011-07-04 Mon (他の年の同じ日: 2004 2005)
PreferenceのEditTextとListは文字列だよ
2011-07-04-1 / カテゴリ: [Android] / [permlink]
ListPreference で文字列しか使用できないのは、内部処理がテキスト配列として認識しているため。
同じように、EditTextPreferenceがテキストonlyなのは、内部処理がテキスト扱いのため。
    public ListPreference(Context context, AttributeSet attrs) {
        super(context, attrs);

        TypedArray a = context.obtainStyledAttributes(attrs,
                com.android.internal.R.styleable.ListPreference, 0, 0);
        mEntries = a.getTextArray(com.android.internal.R.styleable.ListPreference_entries);
        mEntryValues = a.getTextArray(com.android.internal.R.styleable.ListPreference_entryValues);
        a.recycle();
同じように、EditTextPreferenceがテキストonlyなのは、内部処理がテキスト扱いのため。
    public void setText(String text) {
        final boolean wasBlocking = shouldDisableDependents();

        mText = text;

        persistString(text);

        final boolean isBlocking = shouldDisableDependents();
        if (isBlocking != wasBlocking) {
            notifyDependencyChange(isBlocking);
        }
    }
    protected void onSetInitialValue(boolean restoreValue, Object defaultValue) {
        setText(restoreValue ? getPersistedString(mText) : (String) defaultValue);
    }
Referrer (Inside):
[2011-07-03-1] [2011-06-08-1]
[
コメント ]
PreferenceActivity/PreferenceScreenで設定画面(Checkbox, EditText, List)
2011-07-03-1 / カテゴリ: [Android] / [permlink]
《続きを読む》
Referrer (Inside):
[2011-07-25-1]
[
コメント ]
2011-07-01 Fri (他の年の同じ日: 2004 2007)
Highslide JSを入れてみた
2011-07-01-1 / カテゴリ: [chalow] / [permlink]
画像をかっこよくみせるjsライブラリ。
Highslide JS - JavaScript thumbnail viewer
参考にしたのは「小粋空間: Highslide JS でサムネイル画像を拡大表示する」で、使ったのは version 4.1.12
テスト

変更点
Changelog内の記述
あ、Nexus S(白)が結構安価だったので買っちゃいました!NFC動かしたくて。
てわけで、暇を見つけて写真系はこれ使ってそのうち修正する。
Highslide JS - JavaScript thumbnail viewer
参考にしたのは「小粋空間: Highslide JS でサムネイル画像を拡大表示する」で、使ったのは version 4.1.12
テスト

変更点
--- cl.conf	(revision 1856)
+++ cl.conf	(revision 1857)
@@ -157,12 +157,14 @@
 <script type="text/javascript" src="scripts/shBrushPerl.js"></script>
 <script type="text/javascript" src="scripts/shBrushSql.js"></script>
 <script type="text/javascript" src="scripts/shBrushXml.js"></script>
+<script type="text/javascript" src="highslide/highslide.js"></script>
 <link type="text/css" rel="stylesheet" href="styles/shCore.css"/>
 <link type="text/css" rel="stylesheet" href="styles/shThemeDefault.css"/>
 <script type="text/javascript">
     SyntaxHighlighter.all();
     SyntaxHighlighter.config.tagName = "pre";
     SyntaxHighlighter.defaults['toolbar'] = false;
+    hs.graphicsDir = 'highslide/graphics/';
 </script>
 __HEADER__

@@ -641,3 +643,9 @@
     my ($txt, $link) = @_;
     return qq(<a href="$link">$txt</a>);
 }
+
+sub jsimg {
+    my ($img) = @_;
+    (my $thumb = $img)=~ s/(\..+)$/_s$1/;
+    return qq(<a href="$img" class="highslide" onclick="return hs.expand(this)"><img src="$thumb" /></a>);
+}
Changelog内の記述
{{jsimg("img/2011-07-01-1.jpg")}}
指定ファイル名のオリジナルファイルと、拡張し手前に"_s"をつけたサムネ用画像を用意しておく(↑ならimg/2011-07-01-1_s.jpg)あ、Nexus S(白)が結構安価だったので買っちゃいました!NFC動かしたくて。
てわけで、暇を見つけて写真系はこれ使ってそのうち修正する。
[
コメント ]
前の月 / 次の月 / 最新
2013 : 01 02 03 04 05 06 07 08 09 10 11 12
2012 : 01 02 03 04 05 06 07 08 09 10 11 12
2011 : 01 02 03 04 05 06 07 08 09 10 11 12
2010 : 01 02 03 04 05 06 07 08 09 10 11 12
2009 : 01 02 03 04 05 06 07 08 09 10 11 12
2008 : 01 02 03 04 05 06 07 08 09 10 11 12
2007 : 01 02 03 04 05 06 07 08 09 10 11 12
2006 : 01 02 03 04 05 06 07 08 09 10 11 12
2005 : 01 02 03 04 05 06 07 08 09 10 11 12
2004 : 01 02 03 04 05 06 07 08 09 10 11 12
最終更新時間: 2013-05-02 16:12
